To have a robust CRM your data needs to be linked together. To ensure SiteStacker can link everything together we have mapped a migration plan. The most important part is how the Person and their external ID are linked between all the data.
Note: Below is an overview of a series of templates that will need to be filled out and imported to make sure your CRM Records are imported correctly. Clicking on any of these items will scroll you to that specific section, but it is required that you must start at the very top and work your way down to the bottom of this documentation! A reminder that these sections are the various imports and templates that will need to be run during this process!
How To Get Started With Importing:
- First things first - login to your SiteStacker Installation
- Dive in to the 'Import' component under the 'Data Tools' component category
- Click on the 'Documentation' tab and here is where you will find the Import Files needed for the process below
- Select the specific files needed for the following import process and click the 'Download Selected' button
- Follow along with each layout below and make sure you have all the required information input and filled out correctly
General Order of Import | CRM Import Diagram  |
This is to import the CRM record into Site Stacker. The External ID is the ‘connecting piece’ to associate data imports to a CRM.
Note: The bold fields under the Column Name are required fields for importing.
Column Name | Description |
title | Person’s title (Mr., Mrs., Ms., Dr., Rev., etc.) |
firstname | Person’s first name |
middlename | Person’s middle name |
lastname | Person’s last name |
nickname | Person’s preferred name |
maidenname | Person’s maiden name |
suffix | Person’s suffix (Jr., Sr., III, etc.) |
gender | Person’s gender (acceptable values are ‘m’, ‘f’, or empty) |
birthday | Person’s birthday (Y-m-d format) |
Person’s email. This must be unique as Site Stacker does not allow duplicate emails. | |
description | Description for this CRM record (Nice person) |
external_id | Record’s ID from the external data source (Account ID, Missionary ID, Donor ID, etc.) |
household_id | Add the record into this household. If empty, it will create its own household. |
household_name | If empty, this will default to the person’s full name. |
household_external_id | ID that was passed to ‘External_id’ in the household record |
is_household_head | Whether this person will become the head of the household it gets associated to. 0=Default, 1=Yes. |
Person Address
This is to import bulk data to associate an address to a CRM in Site Stacker. Again, the ‘connecting piece’ for this is the CRM’s External ID.
Note: DO NOT delete the Geo Location columns, as these are required by SiteStacker to run the import correctly.
Column Name | Description |
address1 | Address line 1 (123 Main st.) |
address2 | Address line 2 (Apt. 23) |
city | City name |
zip | Zip code / Postal code |
latitude | If you do not pass this, it will automatically be calculated by the system. It is recommended to leave this blank for faster import. |
longitude | If you do not pass this, it will automatically be calculated by the system. It is recommended to leave this blank for faster import. |
default | Marks this record as the contact’s default address |
external_id | Record’s ID from the external data source |
country_code | Must be a valid country code. |
state _code | Must be a valid state code. US State codes |
external_person_id | ID that was passed to ‘external_id’ in the Person/Group data map |
external_person_is_group | Set this to 1 for linking with a people group record. 0=No, 1=Yes. |
Person Phone
This is to associate a phone number to a CRM record.
Column Name | Description |
is_outside_us | Determines if this is a phone number outside the US. 0=No, 1=Yes. |
area_code | For US phone number, you can pass the area code, otherwise, leave this empty. If the area code is empty, it will be extracted from the number. |
number | Phone number with/without area code. If the area code was not passed in the area_code field, it can be passed here. |
default | Marks this record as the contact’s default phone. 0=No, 1=Yes. |
external_person_id | ID that was passed to ‘external_id’ in the Person/Group data map. |
external_person_is_group | Set this to 1 for linking with a people group record. 0=No, 1=Yes. |
Person Photo
Before you do an import for the photo, you will need to save the images to be associated to a CRM record in File Manager first. Take note of the file names that will be used and what folder the images will be saved in the File Manager as these will be needed to map out the file path in the import file.
Column Name | Description |
path | Photo file path on the server. File must be uploaded beforehand. (/images/missionaries/image01.jpg) |
default | Marks this record as the contact’s default photo |
external_person_id | ID that was passed to 'external_id' in the Person/Group data map |
external_person_is_group | Set this to 1 for linking with a people group record. 0=No, 1=Yes. |
Person Activities
This is to associate a CRM record with activities from the external data source. There are multiple import files related to activities including Chat, Conversation, Email, Phone Call, Text, Social Media, and more! The following table gives a breakdown of these import files as they are all the same:
Column Name | Description |
external_id | Note type (This can be whatever note type you want to set this up to.) |
subject | Note subject |
body | Note body (Full note for the CRM) |
notes | Marks the note as important. 0=No, 1=Yes. |
date | This is the date of when the activity took place (YYYY-MM-DD) |
external_person_id | ID that was passed to 'external_id' in the Person/Group data map |
external_person_is_group | Set this to 1 for linking with a people group record. 0=No, 1=Yes. |
from_external_person_id | ID that was passed to 'external_id' in the Person/Group data map. This is the External ID for the ‘from’ person. |
from_external_person_is_group | Set this to 1 for linking with a people group record. 0=No, 1=Yes. |
The other import file that you will want to keep your eye on is the 'Activity People' import documentation as this will add the External IDs of each of the activities and is also where you will link the activity to the Person/Group of which it is related. See the table for the information needed within this import file:
Column Name | Description |
external_activity_id | This is the ID passed to the Activity data map |
external_person_id | This is the ID that was passed to the 'external_id' in the Person/Group data map |
external_person_is_group | Set this to 1 for linking with a people group record. 0=No, 1=Yes. |
Person Note
This is to associate a CRM record with a note from the outside data source.
Column Name | Description |
type | Note type (This can be whatever note type you want to set this up to.) |
subject | Note subject |
body | Note body (Full note for the CRM) |
important | Marks the note as important. 0=No, 1=Yes. |
external_person_id | ID that was passed to 'external_id' in the Person/Group data map |
external_person_is_group | Set this to 1 for linking with a people group record. 0=No, 1=Yes. |
external_from_person_id | ID that was passed to 'external_id' in the Person/Group data map. This is the External ID for the ‘from’ person. |
external_from_person_is_group | Set this to 1 for linking with a people group record. 0=No, 1=Yes. |
Person File
This is to associate a CRM record with files from the outside data source.
Column Name | Description |
external_id | Note type (This can be whatever note type you want to set this up to.) |
label | This is the import file label. |
external_person_id | ID that was passed to 'external_id' in the Person/Group data map |
external_person_is_group | Set this to 1 for linking with a people group record. 0=No, 1=Yes. |
import_path | The path used in the Import - Secure File Uploads section. |
Entities
Entities are custom fields/data that can be associated with a CRM. If the data to be imported is not native to Site Stacker, an entity is needed to be added in Site Stacker to house these data.
To get an in-depth experience as to how these entities are used, please click here!
Note: Datagroups are also a big part of Entities! Click here to see how to import them!
How to Add an Entity:
- Log into your SiteStacker installation and click on the 'CRM' component

- Click the 'Configurations' tab located at the left side of the screen
- Click the 'Entities' tab found on the top side of the screen
- Click the ‘Add Entity Group’ button, name it and click ‘Save & Close’

- Now, you can add an Entity in the Entity Group
- An Entity is a category that can house entity fields.
- For example, you can have an ‘Education’ entity and have Grade, Distance to school, School Progress, Favorite Subject, etc. as Entity Fields.
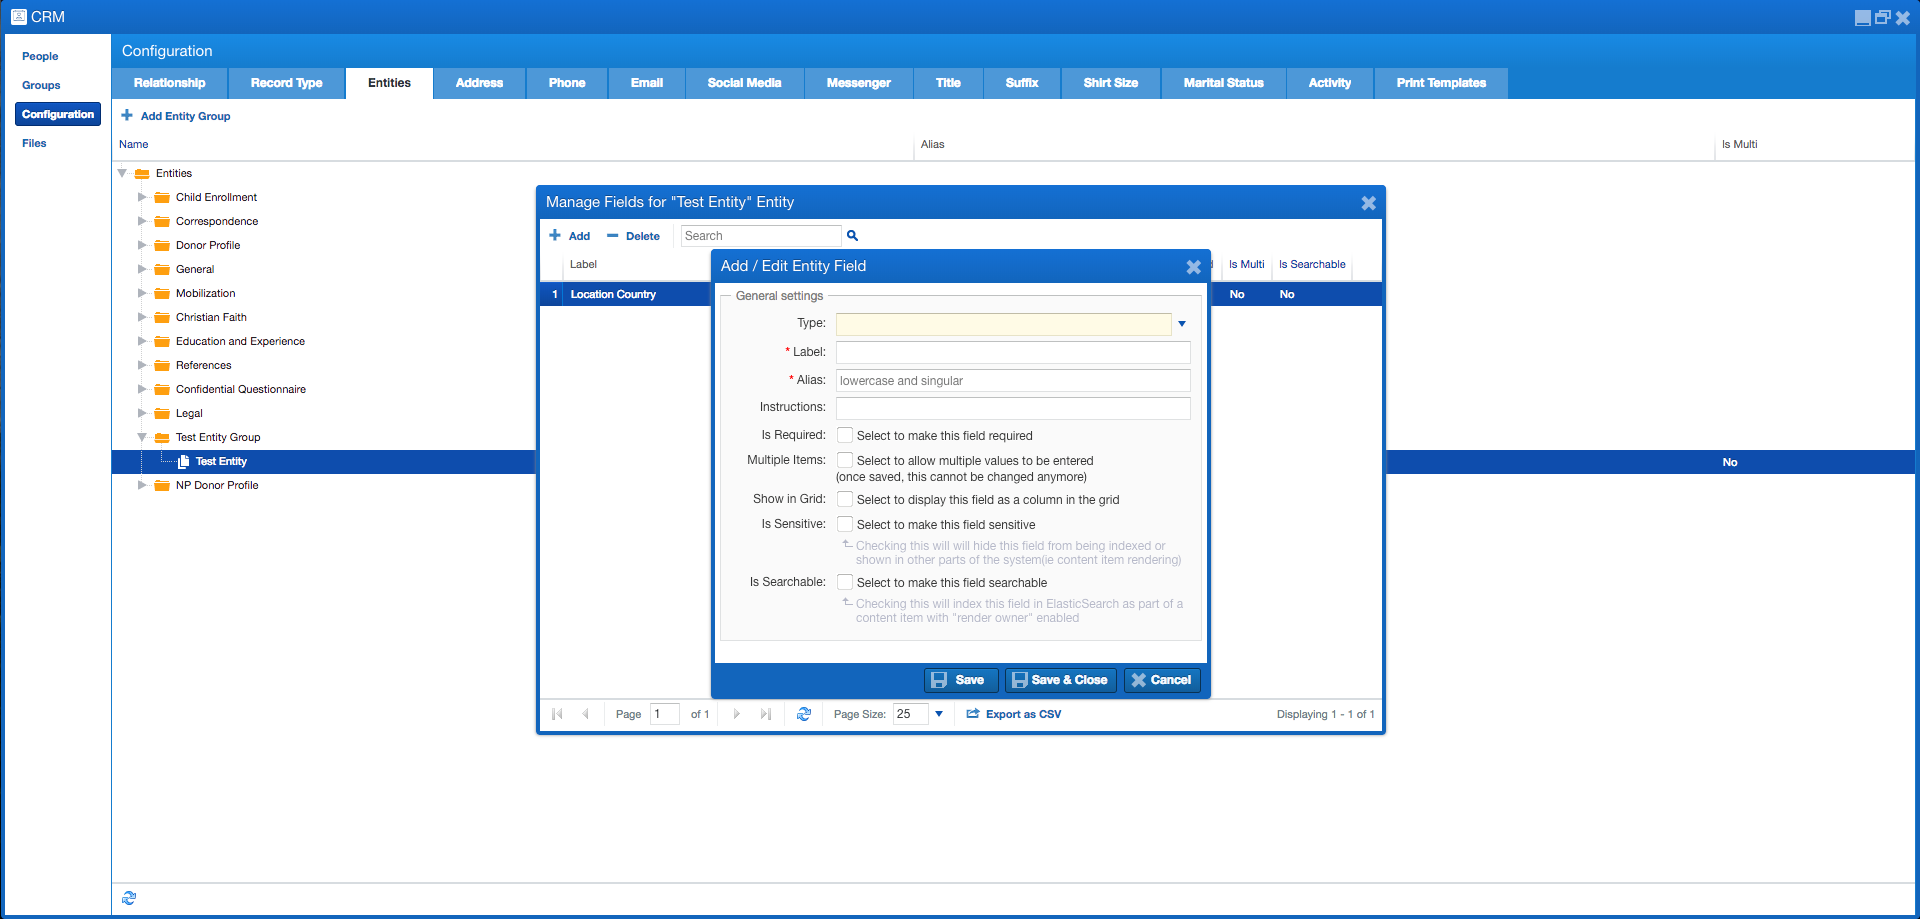
- Right-click on an Entity and click ‘Manage Fields’
- This is where you can add the different entity fields that will fall under this Entity.
- You can easily Add an Entity by clicking on the 'Add' button.
Note: Once you have all the entities needed, the template for these entities should now be available in the ‘Import’ component under the Documentation tab.
Column Name | Description |
external_person_id | ID that was passed to 'external_id' in the Person/Group data map |
external_person_is_group | Set this to 1 for linking with a people group record. 0=No, 1=Yes. |
{entity name} | This is the Entity added into the CRM record |
Record Types
What are they?
Record Types are in a way, tags that are associated with a CRM record.
What are the uses?
- Can be used to filter out CRM records, example; tagging CRM records with a ‘Missionary’ record type.
- You can now use this to filter your CRM record with records that are missionaries.
- We also use Record Types to trigger an event into Spark or Motion 2.
What's the difference between Tags and Record Types?
Tags are mostly used for the front-side filtering (ex. Filtering a country on where a missionary serves), and Record Types are ‘tags’ used in the CRM and can also be used to filter the CRM record or trigger an event through Spark (ex. Filtering Missionaries in the CRM record).
IMPORTANT: If you are importing the Donor record type, please make sure that you DISABLE the Spark Events labeled:
- Person Type Assignment - Person Type is Donor
- Person Type Unassigned (all)
- Person Assigned to Workflow - Workflow is Donor Management and role is Donor
- Person Type Assignment (if there is one)
before you do so! If you do not, then this will create a HUGE mess so please do this!
Note: To associate Record Types through bulk data import into Site Stacker, the Record Type should first be added in the CRM.
How to Add a Record Type:
Click the 'CRM' component
- Click the ‘Configuration’ tab found on the left side of the screen
- Click the ‘Record Type’ tab found on the upper side of the screen
- Click ‘Add’ and name the Record Type
- There are a few ways that you can have a Record Type applied as follows:
Check the 'Person Type' checkbox if the record type will be used for a person type
Check the 'Group Type' checkbox if the record type will be used for a group type
Check 'Both' if the record type will be used for a person or a group type
Once configured completely, click ‘Save & Close’

Note: You can now go to the Import component and find the Record Type you wish to use for bulk imports and download the template needed.
CRM Record Type - {Added Record Type}
Column Name | Description |
external_person_id | ID that was passed to 'external_id' in the Person/Group data map |
external_person_is_group | Set this to 1 for linking with a people group record. 0=No, 1=Yes. |
Relationships
What are they?
Relationships is used to establish a connection or relationship to a CRM record. An example is establishing a connection between a Sponsor to a Sponsored Child.
What are the uses?
- Relationships can be configured to be dynamic in a way where an admin can add the ‘Sponsored by’ relationship and automatically assign the ‘Sponsor of’ to the other CRM record.
- This can also be used to track the spouse relationship between CRM records.
Before you can import the relationship to a CRM record, the relationship should be added in the CRM component first.
How to Add Relationships:
Click the 'CRM' component.
- Click the ‘Configuration’ tab found on the left side of the screen.
- On the ‘Relationship’ tab, click the ‘Add’ button and name the Relationship.
Check the ‘Opposite’ checkbox if you wish to add a relationship with an opposite label.
Check the ‘Is Membership’ type if you wish to add a relationship between a Person Type CRM record and a Group Type CRM record.
Name the alias.
- Click ‘Save & Close’.

Note: After the Relationship has been added, the template should now be available to download in the Import component.
CRM Relation Type - {Added Relationship}
Column Name | Description |
external_person_id | ID that was passed to 'external_id' in the Person/Group data map |
external_person_is_group | Set this to 1 for linking with a people group record. 0=No, 1=Yes. |
related_external_person_id | ID that was passed to 'external_id' in the Person/Group data map |
related_external_person_is_group | Set this to 1 for linking with a people group record |
description | Description of relationship |
Modified on Mon, 25 Sep, 2023 at 9:42 AM
Was this article helpful?
That’s Great!
Thank you for your feedback
Sorry! We couldn't be helpful
Thank you for your feedback
Feedback sent
We appreciate your effort and will try to fix the article